Stealth 3D Mouse
Developer's Guide, Version 4
This paper is intended to provide a starting point for developers who wish to integrate the Stealth 3D Mouse with their software. The Stealth 3D mouse is built on a Kensington Mouse board with an Agilent (formerly Hewlett-Packard) Optical Navigation engine. The mouse is PS/2 and USB compatible.
It is possible to have a PS/2 and USB mouse working on the same computer at the same time. This allows the user to switch from a regular mouse to the Stealth 3D Mouse at will. For computers without both PS/2 and USB, there is a device called an Y-Mouse, which allows two PS/2 or USB mice to connect to a single computer port. For more information, visit their web site at www.y-mouse.com. At www.connectronics.com, you can get about 20% off on a purchase of 10 units, or call Lisa at 1-800-366-3780.
The information provided here in respect to Windows programming has not been verified by the author in all cases with actual examples. Please do your own investigations, beginning with the Internet links shown in section 4.0.

The device is an ergonomic, two-handed mouse with 10 physical buttons and nine logical buttons (2 have the same function) and a wheel which we call the Z-Wheel. It has an optical XY motion sensor, a high-resolution wheel, and is compatible with 5-button wheel mouse such as Microsoft Explorer mouse and Kensington Mouse-in-a-Box Optical Pro. It is delivered with Kensington Mouse software, which makes it compatible with Microsoft Windows 95, 98, NT 3.5, Windows Me, and Windows 2000.
The mouse can be programmed for up to 31 functions. By pressing combinations of buttons (maximum of three buttons,) up to 31 functions can be generated, although all 31 may not be available under all operating systems and all programming schemes.
The Stealth 3D Mouse buttons are arranged like this:
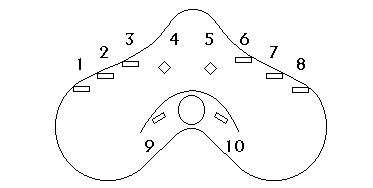
While there are a total of nine logical buttons (9 and10 being the same,) the Stealth 3D Mouse is still compatible with a 5-button mouse, because it sends a combination of buttons. The logic table follows (the code assumes L=1, R=2, M=4, X1=8 and X2=16):
|
Button |
Mouse Code |
|
1 |
8 (X1) |
|
2 |
5 (L + M) |
|
3 |
6 (R + M) |
|
4 |
3 (L+R) |
|
5 |
1 (L) |
|
6 |
4 (M) |
|
7 |
2 (R) |
|
8 |
16 (X2) |
|
9 & 10 |
7 (L + R + M) |
The buttons are arranged to make sense to a right-handed user. That is, buttons 5, 6, and 7 are in the same position as for a normal 3-button mouse. If you have not seen a 5-button mouse before, you will be wondering about X1 and X2. These are two new keys defined by Microsoft with the introduction of the 5-button wheel mouse. Unfortunately, they are not as easy to read in all cases as the standard mouse buttons are. There will be more about this in section 2.0.
Before writing software to read the mouse, it is necessary to establish the type of mouse driver in use, or better yet, to write the software to work with either of the two available mouse drivers.
2.1 Kensington MouseWorks Software
The Stealth 3D Mouse is delivered with Kensington MouseWorks Version 5.4.1. This version does not work correctly with respect to the programming examples shown here. Please download and install MouseWorks version 5.6.0 which also supports Windows 2000 and Windows Me, and is available at www.kensington.com.
|
Button |
Definition |
|
Left Button |
Click |
|
Right Button |
Right Click |
|
Scroll Button |
Middle Click |
|
Both Left and Right |
Under "System-Wide Settngs", set the "Chording Speed" to the maximum value (the image of the mouse will turn gray) to disable this feature |
|
Left Application Button (X1) |
Hold the Ctrl key down while clicking on the button. Choose "Custom" and enter "1[Keydown (Shift)];2[Keyup (Shift)]". This will create a keyboard shift. |
|
Right Application Button (X2) |
Choose "Custom" as above, and enter "1[Keydown (Ctrl)];2[Keyup (Ctrl)]". |
|
Both Application Buttons |
This feature will be disabled together with "Both Left and Right" above |
MouseWorks also allows a selection of scrolling means. Check the box labeled "Office 97 Style Scrolling". This will allow you to read the Stealth 3D Z-Wheel correctly using the Microsoft style scrolling message.
In addition, various options of MouseWorks are quite useful. Movement speed and acceleration can be varied, a slow motion selection is provided, and different programs can be defined to work with different button combinations. The settings can be stored in a file so that different operators can use the mouse with different preferences, and the file can be distributed with your product.
2.2 Microsoft IntelliPoint Software
While not quite as flexible as Kensington MouseWorks, IntelliPoint 3.0 has some features which make its use more convenient in some ways. Specifically, there is no provision for different users to have their own settings.
The following settings provide the same functionality as that shown above:
|
Button |
Definition |
|
Left Button |
Click |
|
Right Button |
Right-Click |
|
Scroll Button |
Middle-Click |
|
Cord |
There is no Cord setting, the Left and Right Buttons always act independently |
|
Left Application Button |
Shift. |
|
Right Application Button |
Control. |
2.3 Comparing and Choosing Mouse Software
MouseWorks 5.4.1 or later software is delivered with the Stealth 3D Mouse. Download version 5.6.0 or later for Windows 2000 or Windows Me.
Microsoft IntelliPoint 3.0 software is delivered with Microsoft mice and possibly with some operating systems. Please check the Microsoft software license to find out if you are allowed to distribute this software, or use it with the Stealth 3D Mouse and your software. In order to use the Stealth 3D Mouse and a Microsoft mouse in a PS/2 only computer, you must use the Y-Mouse PS/2 adapter (find information at www.y-mouse.com). The Y-Mouse converts the Kensington Mouse signals into signals compatible with the Microsoft Intellimouse. It also allows two mice to be used in a single PS/2 port.
Even though the Stealth 3D Mouse is fully functional as a system mouse, most users will find it easier to have a standard mouse as well. Here are the possibilities for software/hardware configurations:
- Stealth 3D Mouse alone (PS2 or USB) – Use Kensington MouseWorks software.
- Stealth 3D Mouse and Kensington Mouse – Plug Stealth 3D Mouse into PS/2 port, and other mouse into the USB port. Use MouseWorks software.
- Stealth 3D Mouse and Microsoft Mouse – There are three solutions. Solution One is recommended for computers with USB support. Solution One is to first install a Microsoft 5-button mouse and Intellipoint software on the PS/2 Port, then reboot and connect the Stealth 3D Mouse to the USB Port. Solution Two is the same as solution one, but uses a Y-Mouse Adapter to connect both the Stealth 3D Mouse and Microsoft mouse to the PS/2 port. Solution Three is to install MouseWorks software with the Stealth 3D Mouse on the PS/2 port, reboot, and connect the MS mouse (or other mouse) to the USB port. Note that with solutions one and two, you must have a 5-button Microsoft mouse. With solution three, a 5-button mouse is not needed, and in any case, the X buttons will not work.
- Stealth 3D Mouse and other Mouse. See Solution Three above.
- More Mice – Not recommended. However, it is possible to daisy chain mice with the Y-Mouse adapter. Use at least one Microsoft Mouse, and IntelliPoint software.
3. Reading XY Coordinates
XY Coordinates are read as with any mouse. There are some points that require different processing however.
3.1 Jumping
While the optical mouse has a high resolution, and works on almost any surface, it is still prone to jumping when the reflection of the surface is too great. It is quite easy to recognize and fix this problem. The typical jump is in the order of 10-20 counts.
When the user is moving slowly, as in following a line, the mouse will never report a movement greater than one count in x and/or y. It is, therefore, easy to recognize any jumping in this situation and eliminate it.
When scanning, however, the user may move more quickly, making it difficult or impossible to recognize a jump. After all, if the user is moving at a rate of 40 counts per cycle, and a jump of 10 occurs, it is insignificant.
As a result, we need to eliminate all the jumps while moving slowly, without eliminating the intentional large movements. Here is the method I use to solve this problem:
- If the previous motion is greater that a test value (2 seems to work well), keep the current motion regardless of its size
- If the previous motion is less than the test value, and the current motion is greater than the test value, eliminate the current motion.
The function can be seen in the sample C program in Appendix A.
4. Reading the Wheel Mouse
The wheel is quite easy to read in Windows 98, Windows 4, Windows Me, and Windows 2000. It is more difficult with the legacy system Windows 95. There is some support for Windows NT 3.51, but not for earlier versions, apparently. However, information on this is spotty and conflicting.
|
Operating System |
Method for Reading Wheel |
|
Windows 95 |
There is no built-in support for the wheel mouse. It is necessary to install special software that comes with the mouse, and create messages and hooks. Hook the message by registering MSH_MOUSEWHEEL message with the RegisterWindowMessage function. Then hook the message with the SetWindowHookEx function. The message MSH_MOUSEWHEEL provides zDelta in wParam. This value is always 120 times the actual movement. |
|
Windows 98, NT 4.0, Me, 2000 |
Built-in support is provided via the message WM_MOUSEWHEEL. zDelta is the high word of wParam. Zdelta is always a multiple of WHEEL_DELTA. In future versions of Windows, WHEEL_DELTA may be a variable determinable by the application. At this time it is fixed at 120. |
|
Windows NT 3.0 |
Not supported. |
|
Windows NT 3.51 |
Support similar to Windows 95 |
4.1 Reading Buttons
T
here are two separate types of buttons on the Stealth 3D Mouse. Buttons 1-7 are read with the standard mouse functions. All operating systems support the following messages for determining the change of state of the three-button mouse: WM_LBUTTONDOWN, WM_LBUTTONUP, WM_LBUTTONDBLCLK, WM_RBUTTONDOWN, WM_RBUTTONUP, WM_RBUTTONDBLCLK, WM_MBUTTONDOWN, WM_MBUTTONUP and WM_MBUTTONDBLCLK. It is possible to determine the current state of all three buttons when any of these are pressed, by interrogating wParam. With this information, the actual button pressed can be determined. One should add up all the button presses by Or-ing the values 1, 2 and 4 when the left, right or middle button are pressed. On the first button release, the total gives the function number.With IntelliPoint software, the X1 and X2 buttons (Microsoft-style Application buttons) are read according to the set-up of the mouse software. Microsoft IntelliPoint software provides for the use of "Back" and "Forward" functions, which are read with the WM_XBUTTONUP, WM_XBUTTONDOWN and WM_XBUTTONDBLCLK messages. The mouse driver software can also be configured to produce Shift and Ctrl keyboard commands. The control status can be read when reading the standard mouse buttons.
With Kensington MouseWorks software, buttons X1 and X2 (Kensington-style Application Buttons) can be configured to provide a variety of signals. "Back" and "Forward" are not available in MouseWorks V5.6.0. However, various unusual combinations are provided. The author has found that using the Shift and Ctrl virtual keyboard keys work better than the alternatives.
The following table shows how to read the X buttons when configured for "Back" and "Forward". When using the Shift and Ctrl virtual keyboard keys, the buttons can be read with any operating system.
|
Operating System |
Method for Reading X1 and X2 Buttons (Back, Forward) |
|
Windows NT 3.51 |
Supported by callback functions. Author has not tried. |
|
Windows 95 |
Supported by callback functions, according to documentation, but author has not been able to make it work. |
|
Windows 98, NT 4.0 |
It is necessary to install special software that comes with the mouse. WM_XBUTTONUP (hex 20C) seems to be supported as well. Hook the WM_XBUTTONDOWN (hex 20B) message and WM_XBUTTONDBLCLK (hex 20D) to find out when an X button is pressed. |
|
Windows Me, Windows 2000 |
Use WM_XBUTTONDOWN (hex 20B), WM_XBUTTONDBLCLK (hex 20D), and WM_XBUTTONUP (hex 20C). |
4.2 Programming Stealth 3D Mouse Button Functions
There are three main methods of using the Stealth 3D Mouse:
- As a five button mouse
- As a nine button mouse
- As a 28 function mouse
- As a 31 function mouse
Following is a list of functions that most programs will need. How these are mapped to the available functions of the mouse are up to each programmer.
- Data. Records a data point
- Reset. Stops recording a line
- Snap. Causes the cursor to snap to a previously recorded location
- Clutch. Allows the mouse to move without changing the cursor position on the screen. This requires the use of the Windows SetCursorPos function, and probably the GetCursorPos function.
- Z-Lock. Locks the Z motion so that the elevation is not changed accidentally
- Mouse Mode Toggle. This function is used to toggle between Mouse Mode and Stereo Mode. In Mouse Mode, panning and line drawing are suspended so that the user can move the cursor outside the current window, so that menu items and other programs can be selected. In Stereo Mode, the program may be panning, or drawing, which would interfere with standard mouse operation.
4.2.1 As a Five Button Mouse
The underlying mouse used in the Stealth 3D Mouse is a Kensington 5-button mouse. It has the three standard buttons, plus two user-programmable buttons. Using the Kensington MouseWorks software, the two X-buttons can be programmed in almost any imaginable way, such as a combination of keystrokes. This is a good option for use where it is not possible to program the combination buttons as shown below.
4.2.2 As a Nine Button Mouse
As a nine button mouse, it is straightforward to program. It is only necessary to discover which button was pressed or released, and act accordingly. It is necessary to program the mouse keys using the MouseWorks or IntelliPoint software to produce separate recognizable button combinations. Microsoft Windows programming generally activates functions on release of the button. Keep in mind that pressing certain buttons will result in up to three Windows messages, for example, Click, Right-Click and Middle-Click. For a nine-button mouse, the author suggests using "Back" and "Forward" definitions for the X buttons with Intellipoint software, and "Shift F1" and "Shift F2" for MouseWorks software.
4.2.3 As a 28 Function Mouse
The Stealth 3D Mouse has seven standard mouse buttons, and two X buttons. Only one standard button can be pressed at one time, (pressing additional buttons will result in a standard function, but probably not the one expected). However, the X buttons can be pressed in any combination with the one standard button. There are four combinations of X buttons: None, X1 alone, X2 alone, and X1 and X2 together. Each of these four combinations can occur with one of the seven standard mouse button combinations, giving up to 28 functions. With this method it is not valid to press only an X button, without any standard button.
The following table shows all the 28 possible combinations.
|
X Buttons |
Standard buttons |
|
None |
2, 3, 4, 5, 6, 7, 9 (&10) |
|
1 (X1) |
2, 3, 4, 5, 6, 7, 9 (&10) |
|
8 (X2) |
2, 3, 4, 5, 6, 7, 9 (&10) |
|
1+8 (X1+X2) |
2, 3, 4, 5, 6, 7, 9 (&10) |
4.2.4 Programming for 28 Functions
Please see the C++ program at the end of this paper.
4.2.5 Programming for 31 Functions
Unfortunately, the X button codes are not handled correctly by the mouse driver at this time, resulting in numerous button up and down messages, making for ambiguous results. It is hoped that future versions will fix these problems. Please consider using the example shown for 28 function mouse at this time.
The other solution is to define the X keys to some unique key combination, such as Ctrl+F1 and Ctrl+F2. When the sequence begins with an X-key, give the user a little more time to press all the buttons.
5.0 Messages, Masks, and References
The following tables shows relevant Windows messages and their corresponding hex value for the wheel mouse and X buttons, and the masks for separating the various components from the parameters. The referenced web sites provide valuable information for programmers, including descriptions and examples.
|
Message |
Hex ID |
Reference |
|
General |
http://msdn.microsoft.com/library/psdk/winui/mousinpt_2jas.htm http://msdn.microsoft.com/library/psdk/winui/mousinpt_9oyt.htm http://www.microsoft.com/Mouse/intellimouse/sdk/sdkmessaging.htm http://msdn.microsoft.com/library/techart/msdn_intmouse.htm | |
|
MSH_MOUSEWHEEL |
Run time |
http://msdn.microsoft.com/library/psdk/winui/mousinpt_2jas.htm |
|
WM_MOUSEWHEEL |
20A |
http://msdn.microsoft.com/library/psdk/winui/mousinpt_5ir0.htm |
|
WM_APPCOMMAND |
319 |
http://msdn.microsoft.com/library/psdk/winui/sdkmessaging.htm |
|
WM_TIMER |
113 |
Issued when timer expires |
|
WM_LBUTTONDOWN |
201 |
|
|
WM_LBUTTONUP |
202 |
|
|
WM_LBUTTONDBLCLK |
203 |
|
|
WM_RBUTTONDOWN |
204 |
|
|
WM_RBUTTONUP |
205 |
|
|
WM_RBUTTONDBLCLK |
206 |
|
|
WM_MBUTTONDOWN |
207 |
|
|
WM_MBUTTONUP |
208 |
|
|
WM_MBUTTONDBLCLK |
209 |
|
|
WM_XBUTTONDOWN |
20B |
http://msdn.microsoft.com/library/psdk/winui/mousinpt_6pv7.htm |
|
WM_X2BUTTONUP |
20C |
Found by trial and error, not from official sources. |
|
WM_XBUTTONDBLCLK |
20D |
" |
|
WM_NCXBUTTONUP |
? |
Could not be found, but WM_APPCOMMAND seems to do the job |
|
Mask |
Value |
Function |
|
FAPPCOMMAND_MOUSE |
10000000 |
Lparam mask for use with WM_APPCOMMAND to find if user clicked a mouse button. |
|
MK_LBUTTON |
1 |
Mask for L button down. Applies to lParam with appcommand, and to wParam for all button down/up messages |
|
MK_RBUTTON |
2 |
Mask for R button down as above |
|
MK_MBUTTON |
10 |
Mask for M button down as above |
|
MK_XBUTTON1 |
1000 |
Mask for X1 down. Applies to appcommand with lParam, and all button down/up messages under Windows 2000 only with wParam. |
|
MK_XBUTTON2 |
2000 |
Mask for X2 down. Applies to same as above. |
6.0 Windows Functions
The following table shows relevant Windows functions which might be needed to read the wheel mouse and X buttons. They are all standard Windows functions.
|
Function |
Purpose |
|
GetSystemMetrics (75) |
Returns 1 if wheel mouse supported. SM_MOUSEWHEELPRESENT = 75 |
|
RegisterWindowMessage |
Returns run-time identifier |
|
SetWindowHookEx |
Hooks window message to application program |
|
GetCursorPos |
Gets the cursor position in pixels from top left |
|
SetCursorPos |
Sets the cursor position in pixels from top left |
|
SetTimer |
Starts a timer |
|
KillTimer |
Stops a timer |
|
GetKeyStatus (key) |
Returns negative if virtual key is pressed (the Shift key is hex 10, Ctrl is hex 11, and Alt is hex 12) |
Please contact the author if you have any questions about programming or operation of the mouse, or if you have any constructive criticism of the Stealth 3D Mouse. We want to know how to make it work better for you.
30 April, 2001
Timothy Roberts, Development Director
ABC Software Developers
Email: info@stealth3dmouse.com
Appendix A – Sample Program
/*---------------------------------------------------
BLOKOUT2.C -- Mouse Button & Capture Demo Program
(c) Charles Petzold, 1996
modified by T. Roberts, April 2001
to show multiple button sequence
also shows shift and control keys
---------------------------------------------------*/
#include
#include
#define WM_WHEELMOVE 0x20A
#define NUM 10000
WPARAM swParam ;
LPARAM slParam ;
int timeron = 0 ;
int shift = 0 ;
int control = 0 ;
int but[32] = {0,0,0,0,0,0,0,0,0,0,0,0,0,0,0,0,0,0,0,0,0,0,0,0,0,0,0,0,0,0,0,0} ;
int Z = 0 ;
int Ztotal = 0 ;
POINT pts[NUM] ;
int ptsize = 0;
LRESULT CALLBACK WndProc (HWND, UINT, WPARAM, LPARAM) ;
int WINAPI WinMain (HINSTANCE hInstance, HINSTANCE hPrevInstance,
PSTR szCmdLine, int iCmdShow)
{
static char szAppName[] = "BlokOut2" ;
HWND hwnd ;
MSG msg ;
WNDCLASSEX wndclass ;
wndclass.cbSize = sizeof (wndclass) ;
wndclass.style = CS_HREDRAW | CS_VREDRAW ;
wndclass.lpfnWndProc = WndProc ;
wndclass.cbClsExtra = 0 ;
wndclass.cbWndExtra = 0 ;
wndclass.hInstance = hInstance ;
wndclass.hIcon = LoadIcon (NULL, IDI_APPLICATION) ;
wndclass.hCursor = LoadCursor (NULL, IDC_ARROW) ;
wndclass.hbrBackground = (HBRUSH) GetStockObject (WHITE_BRUSH) ;
wndclass.lpszMenuName = NULL ;
wndclass.lpszClassName = szAppName ;
wndclass.hIconSm = LoadIcon (NULL, IDI_APPLICATION) ;
RegisterClassEx (&wndclass) ;
hwnd = CreateWindow (szAppName, "Mouse Button & Capture Demo",
WS_OVERLAPPEDWINDOW,
CW_USEDEFAULT, CW_USEDEFAULT,
CW_USEDEFAULT, CW_USEDEFAULT,
NULL, NULL, hInstance, NULL) ;
ShowWindow (hwnd, iCmdShow) ;
UpdateWindow (hwnd) ;
while (GetMessage (&msg, NULL, 0, 0))
{
TranslateMessage (&msg) ;
DispatchMessage (&msg) ;
}
return msg.wParam ;
}
int process_button (WPARAM wParam, LPARAM lParam, HWND hwnd)
{
swParam = wParam ; // save params for timer
slParam = lParam ;
shift = (GetKeyState (16) < 0);
control = (GetKeyState (17) < 0) ;
if (!timeron)
{
timeron = 1 ; // flag timer on
SetTimer (hwnd, 1, 60, NULL) ; // start 60 ms timer
}
return 0;
}
LRESULT CALLBACK WndProc (HWND hwnd, UINT iMsg, WPARAM wParam, LPARAM lParam)
{
static BOOL fBlocking, fValidBox ;
static POINT ptBeg, ptEnd, ptBoxBeg, ptBoxEnd ;
static int tbutton = 0 ;
static int ubutton = 0 ;
static int ttbutton = 0 ;
HDC hdc ;
PAINTSTRUCT ps ;
char str[35];
static int savex = 200;
static int savey = 200;
static int olddx = 0 ;
static int olddy = 0 ;
static int no_repeat = 0;
POINT pt ;
int dx,dy ;
char inst[] = {"Hold Left Button to Draw, Click Right to Erase."} ;
switch (iMsg)
{
case WM_LBUTTONDOWN :
tbutton |= 1; // save button down code
process_button (wParam, lParam, hwnd) ;
return 0;
case WM_RBUTTONDOWN :
tbutton |= 2;
process_button (wParam, lParam, hwnd) ;
return 0;
case WM_MBUTTONDOWN :
tbutton |= 4;
process_button (wParam, lParam, hwnd) ;
return 0;
case WM_LBUTTONUP :
ubutton |= 1; // save button ups
process_button (wParam, lParam, hwnd) ;
return 0;
case WM_RBUTTONUP :
ubutton |= 2;
process_button (wParam, lParam, hwnd) ;
return 0;
case WM_MBUTTONUP :
ubutton |= 4;
process_button (wParam, lParam, hwnd) ;
return 0;
case WM_TIMER :
KillTimer (hwnd,1); // must kill timer immediately to prevent it from firing
timeron = 0 ;
SendMessage (hwnd, WM_USER, swParam, slParam) ; // done, process button
return 0;
case WM_USER :
// tbutton &= 7; // remove shift and control
if (shift != 0) tbutton |= 8; // add them back if pressed
if (control != 0) tbutton |= 16;
but[tbutton] = tbutton & 7 ; // set flag for button combination pressed
but[7] = tbutton;
ttbutton |= tbutton ; //total of all buttons currently pressed
ttbutton &= 7; // remove shift and control
if (shift) ttbutton |= 8; // add them back if pressed
if (control) ttbutton |= 16;
if (tbutton)
{
InvalidateRect (hwnd, NULL, TRUE) ; // force paint message
process_button (wParam, lParam, hwnd) ;
goto fini;
}
// remove any up buttons
// releasing button 1 means all button combinations using 1 must be turned off
if (ubutton & 1)
{
but[1] = but[3] = but[5] = but[7] = 0;
but[9] = but[11] = but[13] = but[15] = 0;
but[17] = but[19] = but[21] = but[23] = 0;
but[25] = but[27] = but[29] = but[31] = 0;
ttbutton &= 6;
}
if (ubutton & 2)
{
but[2] = but[3] = but[6] = but[7] = 0;
but[10] = but[11] = but[14] = but[15] = 0;
but[18] = but[19] = but[22] = but[23] = 0;
but[26] = but[27] = but[30] = but[31] = 0;
ttbutton &= 5;
}
if (ubutton & 4)
{
but[4] = but[5] = but[7] = 0;
but[12] = but[13] = but[15] = 0;
but[20] = but[21] = but[23] = 0;
but[28] = but[29] = but[31] = 0;
ttbutton &= 3;
}
InvalidateRect (hwnd, NULL, TRUE) ; // force paint message
ubutton = 0 ; // ready for next button up
fini:
tbutton = 0 ; // ready for next button down
// erase drawing on right click
if (but[2])
{
ptsize = 0 ;
InvalidateRect (hwnd, NULL, TRUE) ; // force paint message
}
return 0 ;
case WM_MOUSEMOVE :
// do not repeat processing when called by SetCursorPos
if (no_repeat)
{
no_repeat = 0; // next time ok
return 0;
}
// detect and eliminate jumps
// the theory is to use a "flywheel" effect. The cursor cannot slow down
// or speed up too fast. Restrict the acceleration and deceleration to two ticks
// per cycle.
// Note that repositioning the cursor will call this message again,
// so make sure to ignore the second message
pt.x = LOWORD (lParam) ;
pt.y = HIWORD (lParam) ;
dx = pt.x - savex ; // motion since last time
dy = pt.y - savey ;
// eliminate large jump when leaving and re-entering window
if ( (abs (dx) > 100) || (abs (dy) > 100))
{
savex = pt.x ;
savey = pt.y ;
olddx = olddy = 0 ;
}
// allow change of up to 2 ticks, plus or minus
if (dx > olddx) olddx ++ ;
if (dx > olddx) olddx ++ ;
if (dx < olddx) olddx -- ;
if (dx < olddx) olddx -- ;
if (dy > olddy) olddy ++ ;
if (dy > olddy) olddy ++ ;
if (dy < olddy) olddy -- ;
if (dy < olddy) olddy -- ;
savex += olddx ; // save new position
savey += olddy ;
// if no movement, we don't need to process
if ( (savex != pt.x) || (savey != pt.y))
{
pt.x = savex ;
pt.y = savey ;
ClientToScreen (hwnd, &pt) ;
SetCursorPos (pt.x, pt.y) ; // put cursor to new position
no_repeat = 1 ; // do not process the next movement, it will be zero
InvalidateRect (hwnd, NULL, TRUE) ; // force paint message
}
// draw if left pressed
if (but[1])
{
pts[ptsize].x = LOWORD (lParam) ;
pts[ptsize].y = HIWORD (lParam) ;
ptsize ++;
if (ptsize > NUM) ptsize = NUM ;
InvalidateRect (hwnd, NULL, TRUE) ; // force paint message
}
return 0 ;
case WM_WHEELMOVE :
Z = (int) wParam / 65536 ; // High word is Z
Z = Z / 120 ; // currently, MS multiplies by 120, may change in future.
Ztotal += Z ;
InvalidateRect (hwnd, NULL, TRUE) ; // force paint message
return 0 ;
case WM_PAINT :
hdc = BeginPaint (hwnd, &ps) ;
// display each button code
sprintf (str, "None %d%d%d%d%d%d%d", but[1], but[2], but[3], but[4],
but[5], but[6], but[7]);
TextOut (hdc, 0, 0, str, strlen (str));
sprintf (str, "Shift %d%d%d%d%d%d%d", but[9], but[10], but[11], but[12],
but[13], but[14], but[15]);
TextOut (hdc, 0, 20, str, strlen (str));
sprintf (str, "Ctrl %d%d%d%d%d%d%d", but[17], but[18], but[19],
but[20], but[21], but[22], but[23]);
TextOut (hdc, 0, 40, str, strlen (str));
sprintf (str, "ShfCtrl %d%d%d%d%d%d%d", but[25], but[26], but[27],
but[28], but[29], but[30], but[31]);
TextOut (hdc, 0, 60, str, strlen (str));
// Display shift, ctrt
sprintf (str, "Shift %d Ctrl %d", shift, control);
TextOut (hdc, 0, 80, str, strlen (str));
// Display Z
sprintf (str, "Z %d Z Total %d", Z, Ztotal);
TextOut (hdc, 0, 100, str, strlen (str));
// Display dx
sprintf (str, "dx %d dy %d", olddx, olddy);
TextOut (hdc, 0, 120, str, strlen (str));
// Display Instructions
TextOut (hdc, 0, 140, inst, strlen (inst));
// Draw Polyline
Polyline (hdc, pts, ptsize) ;
EndPaint (hwnd, &ps) ;
return 0 ;
case WM_DESTROY :
PostQuitMessage (0) ;
return 0 ;
}
return DefWindowProc (hwnd, iMsg, wParam, lParam) ;
}